Over the past couple years it has been on my bucket list to build a robot. I built a few little Otto robots for my kids to assemble and tool around with in the past. They were fun but had pretty limited mobility.
What I was interested in was something that could move. So, over the years, I have started (and not finished) an array of robot designs. From spider-like hexapods and quadrupeds to even dabbling with strandbeests. Almost always the problem was power. If you want a super articulate robot, you need a lot of servos. And servos LOVE sucking up power.
So I randomly stumbled upon yet another quadruped robot design by Sebastian Coddington called the Gorillabot and thought I’d give it one more go.
The printing and assembly process went very smoothly. Sebastian did a great job of thoughtfully making the models easy to print and assemble. After I had everything wired up I came to the power problem again. Luckily, from a previous failed project attempt, I had purchased a pretty powerful 5V power supply. With this power supply I was at least able give the robot the juice it needed to function. So it would run, just wired.
Next, I decided that the code needed a bit of love. So I rewrote the code to be (IMHO) cleaner and more readable. I also removed the Magnetometer (digital compass) dependency and swapped out the RF Transceiver for a Bluetooth module. So now I could control the robot just with my phone.
Lastly, I finally found a solution to my power problem. As Sebastatian suggested, I used some 18650 batteries along with a slick battery shield I found that also doubles as a charger. With the power solution the robot can run untethered.
For now, I have the boards attached to the frame with rubber bands. In the future, I plan to model and print housing for the all 3 boards that can easily be attached to the robot chassis. I will update the project when those are completed.
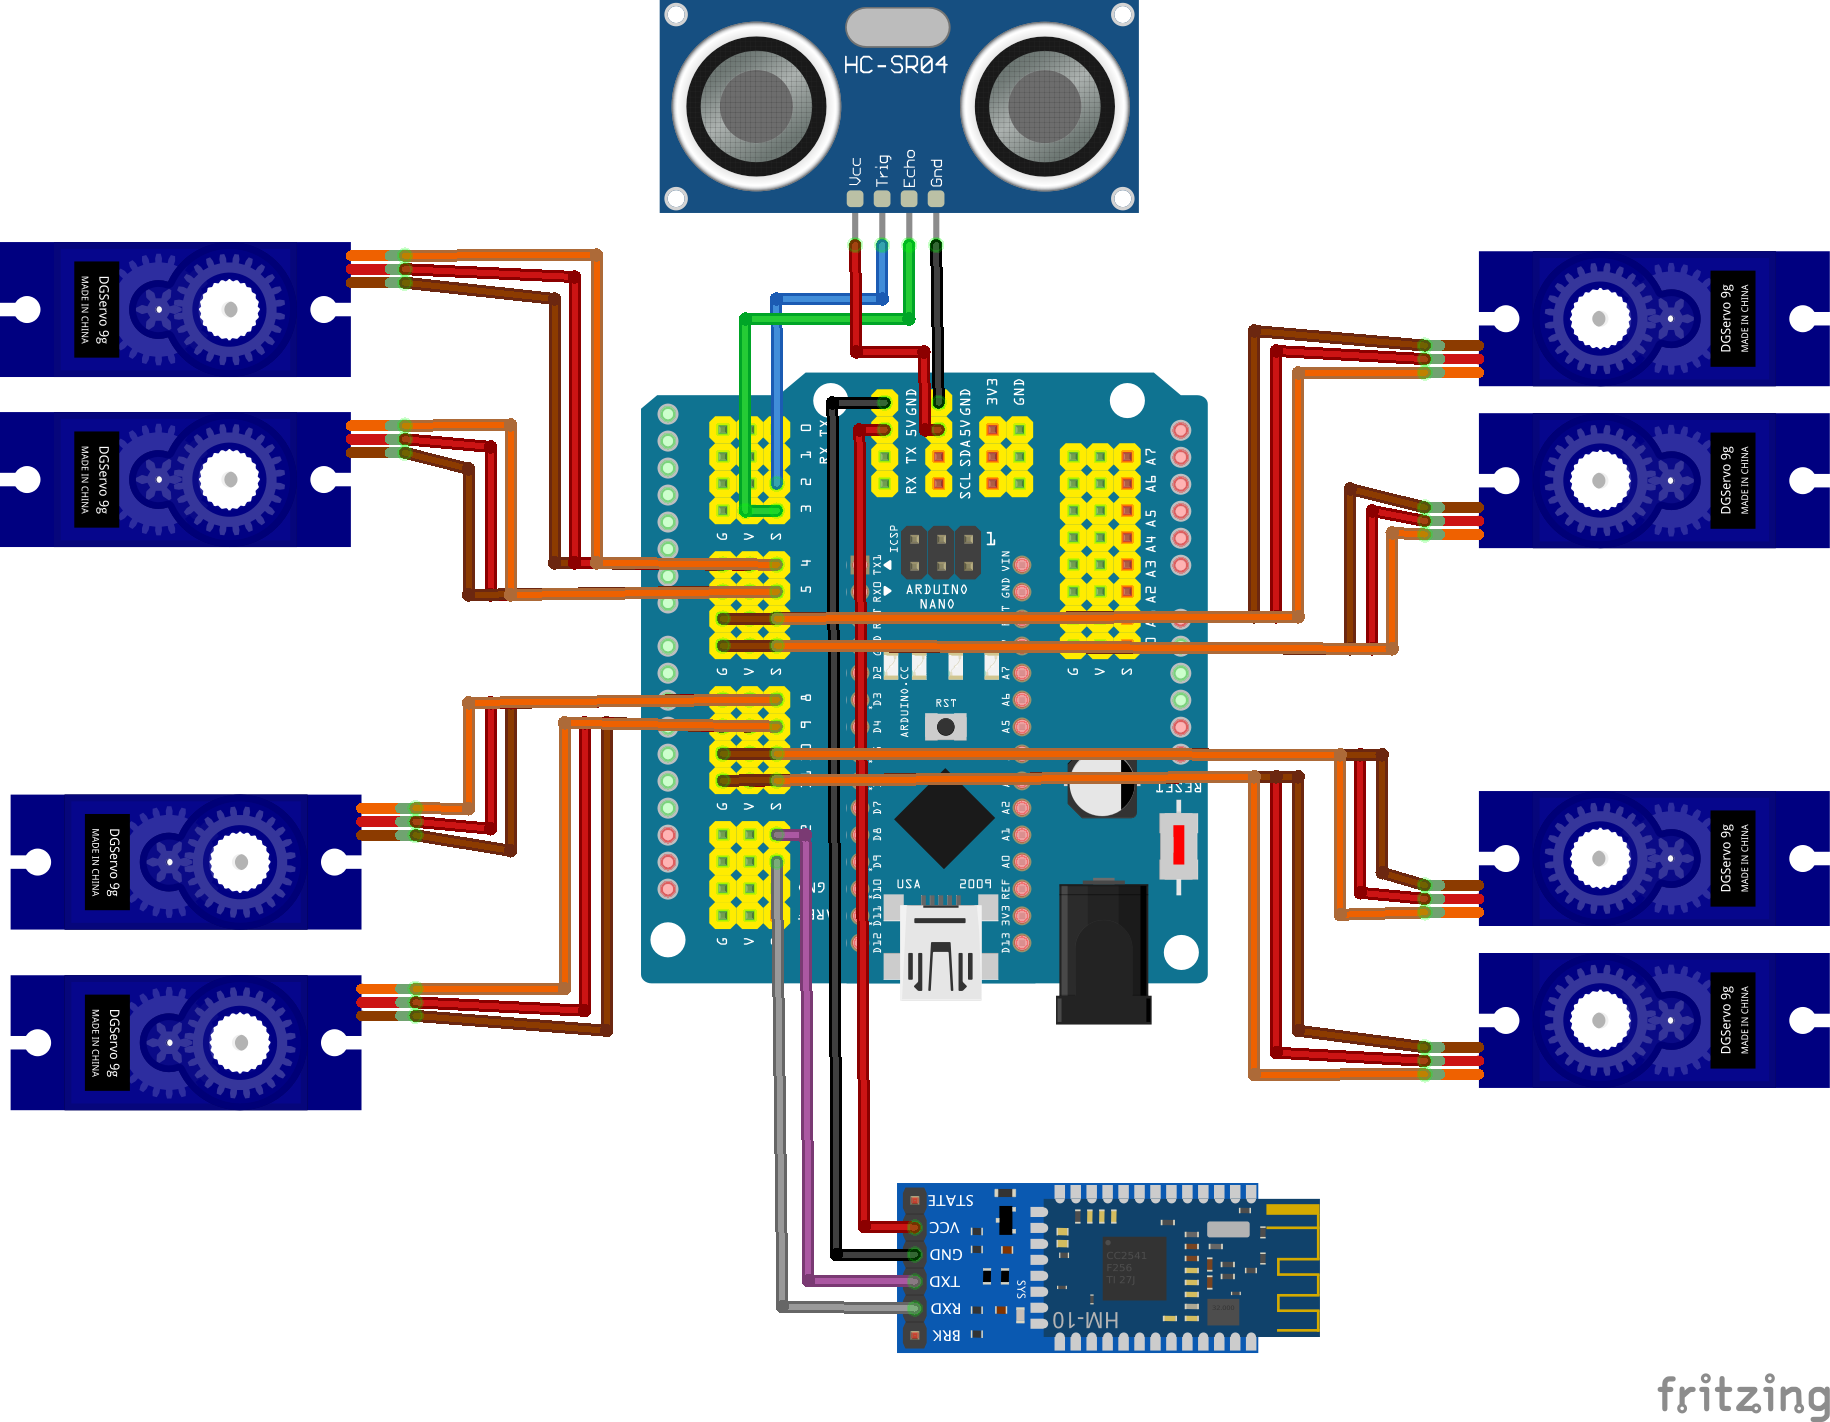
In addition, I created a wiring diagram and full list of materials needed (with purchasable links). So in the off chance that someone else wants to build this fun project they will have an even easier time doing it.
Cheers!
Details


Source Code
All files and code can be found at: https://github.com/joshgerdes/arduino-quadruped-robot
Wiring Diagram

3D Models
All new models were created in Tinkercad and exported in STL format.
- GROUP_BASE_BACK
- GROUP_BASE_ELECTRONICS
- GROUP_BASE_FRONT
- GROUP_CIRCULAR_CLIPS
- GROUP_CIRCULAR_PINS
- GROUP_FEET_AND_SQUARE_CLIPS
- GROUP_LEGS_1
- GROUP_LEGS_2
- GROUP_LEGS_3
- GROUP_LEGS_4
Materials List
| Part | Qty | |
|---|---|---|
| Arduino Nano V3.0 | 1 | https://amzn.to/2Ek0Rtx |
| Nano I/O Shield v3.0 (with 5v toggle switch) | 1 | https://ebay.to/2RIoyPs |
| Ultrasonic Module HC-SR04 Distance Sensor | 1 | https://amzn.to/3mFSaLz |
| HM-10 Bluetooth Module | 1 | https://amzn.to/2RIGpFQ |
| SG90 9G Micro Servos | 8 | https://amzn.to/3iU7odx |
| Breadboard Jumper Wires | 8 | https://amzn.to/2RKGrNF |
| 18650 Battery Shield | 1 | https://amzn.to/2FSBf7O |
| 18650 Batteries | 2 | https://amzn.to/32YADGJ |
| USB to DC 5.5 x 2.1mm 5V cable | 1 | https://amzn.to/2HuPrEN |
Mobile App Configurations
I chose to drive the robot with the ArduinoBlue mobile app and library. The joystick is preconfigured (for steering and throttle) but you will need to setup buttons initially to drive the remaining functionality. The following list of functions are available to setup as buttons within the app:
| ID | Name | Description |
|---|---|---|
| 1 | Autonomous | Toggle on/off autonomous mode |
| 2 | Stand | All legs in an up position |
| 3 | Lay | All legs in a down position |
| 4 | Sit | Back legs in down in a sitting position |
| 5 | Crouch | Front legs in down in a crouching position |
| 6 | Tilt | Tilting each leg in a clockwise rotation |
| 7 | Strut | Strut walk forward for a few paces |